

폴더 구조
카프카 공식 사이트 에서 Binary 파일을 다운로드하고 압축해제하면 아래와 같은 구조를 확인 할수 있습니다.
zookeeper 와 kafka binary 파일이 모두 포함되어 있으며 모두 JVM 환경에서 실행되기때문에 사전에 Java 8 이상이 설치되어 있어야 합니다.

bin 디렉토리는 CLI Script 파일들이 모여있는곳으로 주키퍼, 카프카를 시작하거나 카프카 토픽을 생성하는등의 스크립트 명령어를 실행할 수 있는 파일들이 모여 있습니다.
config 디렉토리는 환경설정 파일들이 모여 있는곳으로 local 에서 카프카를 테스트하려는 경우 아래와 같이 설정 변경이 필요합니다
- server.properties custom 변경 (kakka broker 실행 할 때 필요한 설정 파일, 네트워크설정)
# 카프카 브로커 아이디
broker.id=0

# 카프카 브로커가 통신을 통해서 받을 IP 의미 (주석 해제)
# clinet 와 통신하기 위해서 localhost 추가
listeners=PLAINTEXT://:9092 -> localhost:9002
advertised.listeners=PLAINTEXT://your.host.name:9092 -> localhost:9092

# 프로듀서가 보낼 데이터를 저장하는 저장소 위치 custom change
log.dir=.../data

# num.partitions : 파티션 개수
주키퍼 실행
운영환경에서는 일반적으로 3개의 서버가 앙상블로 묶여서 연동되어 실행되지만 로컬환경에서는 1 대만으로 테스트해볼수 있습니다
> cat config/zookeeper.properties

dataDir=/tmp/zookeeper
clientPort=2181
maxClientCnxns=0
admin.enableServer=false

bin/zookeeper-server-start.sh config/zookeeper.properties
카프카 브로커 실행
아래의 명령어와 config 디렉토리의 server.properties설정을 이용하여 카프카 브로커를 실행 할 수 있습니다
bin/kafka-server-start.sh config/server.properties
카프카 정상 실행 확인
아래 명령어를 통해 localhost 에 실행되고 있는 카프카 정보 및 브로커 토픽 리스트를 확인 가능합니다
- ocalhost:9092 에 kafka 의 정보를 확인
Produce(0): 0 to 8 [usable: 8],
						...
DeleteGroups(42): 0 to 2 [usable: 2],
ElectLeaders(43): 0 to 2 [usable: 2],
IncrementalAlterConfigs(44): 0 to 1 [usable: 1],
AlterPartitionReassignments(45): 0 [usable: 0],
ListPartitionReassignments(46): 0 [usable: 0],
OffsetDelete(47): 0 [usable: 0]
- local에 실행된 카프카 브로커의 토픽 리스트 조회
- 테스트 편의를 위한 hosts 설정
sudo vi /etc/hosts
password : ...

127.0.0.1 my-kafka
kafka-topics.sh
hello.kafka 토픽처럼 카프카 클러스터 정보와 토픽 이름만으로 토픽을 생성 할 수 있습니다. 클러스터 정보와 토픽 이름은 토픽을 만들기 위한 필수 값입니다. 이렇게 만들어진 토픽은 파티션 개수, 복제 개수 등과 같이 다양한 옵션이 포함되어 있지만 모두 브로커에 설정된 기본값으로 생성되어 있습니다
# 토픽 생성
bin/kafka-topics.sh --create --bootstrap-server my-kafka:9092 --topic hello4.kafka

Creaded topic hello.kafka

# 토픽 조회
bin/kafka-topics.sh --bootstrap-server my-kafka:9092 --topic hello4.kafka --describe

파티션 개수, 복제 개수, 토픽 데이터 유지 기간 옵션 등을 직접 지정하여 토픽을 생성하려는 경우는 아래와 같이 직접 옵션을 지정하여 실행하면 됩니다. 그리고 생성된 포틱들의 이름을 조회하려는 경우 —list 옵션을 사용합니다.
# 토픽 custom 생성
bin/kafka-topics.sh --create --bootstrap-server 127.0.0.1:9092 \
--partitions 10 \
--replication-factor 1 \
--topic hello5.kafka \
--config retention.ms=172800000

# 토픽 리스트 조회
bin/kafka-topics.sh --bootstrap-server my-kafka:9092 --list

# 토픽 상세 조회
bin/kafka-topics.sh --bootstrap-server my-kafka:9092 \
--topic hello5.kafka --describe
파티션 개수를 늘려야 하는 경우 -- alter 옵션을 사용해서 늘릴 수 있습니다
# 토픽 생성
./kafka-topics.sh --create --bootstrap-server my-kafka:9092 --topic test

# 토픽 조회
./kafka-topics.sh --bootstrap-server my-kafka:9092 --topic test --describe

# 파티션 개수 변경
bin/kafka-topics.sh --bootstrap-server my-kafka:9092 --topic test \
--alter --partitions 10

# 토픽 조회
./kafka-topics.sh --bootstrap-server my-kafka:9092 --topic test --describe
다만 파티션 개수를 줄일수는 없습니다. 파티션 개수를 줄이는 명령을 내리면 InvalidPratitionsException 이 발생합니다. (파티션을 10개로 늘린 후 5개로 변경하려는 경우)

분산 시스템에서 이미 분산된 데이터를 불이는 방법은 매우 복잡합니다. 삭제 대상 파티션을 지정하고 기존에 저장되어 있는 레코드를 분산하여 저장하는 로직이 필요하기 때문에 파티션을 줄이는 방법을 제공하지 않습니다. 따라서 파티션 개수를 줄여야 하는 상황이 생기면 토픽을 새로 생성하는것이 좋습니다
kafka-config.sh
- 카프카 일부 옵션을 설정하기 위해서는 kafka-config.sh 명령어를 사용해야 합니다.
- —alter 와 —add —config 옵션을 사용하여 min.insync,replicas 옵션을 토픽별로 설정할 수 있습니다
- 브로커에 설정된 각종 기본값은 —broker, —all, —describe 옵션을 사용하여 조회할 수 있습니다
# 브로커 전체 설정 조회
bin/kafka-configs.sh --bootstrap-server my-kafka:9092 --broker 0 -all --describe

All configs for broker 0 are:
  log.cleaner.min.compaction.lag.ms=0 sensitive=false synonyms={DEFAULT_CONFIG:log.cleaner.min.compaction.lag.ms=0}
  offsets.topic.num.partitions=50 sensitive=false synonyms={DEFAULT_CONFIG:offsets.topic.num.partitions=50}
  log.flush.interval.messages=9223372036854775807 sensitive=false synonyms={DEFAULT_CONFIG:log.flush.interval.messages=9223372036854775807}
  controller.socket.timeout.ms=30000 sensitive=false synonyms={DEFAULT_CONFIG:controller.socket.timeout.ms=30000}
  log.flush.interval.ms=null sensitive=false synonyms={}
....
# 토픽 설정 조회
❯ bin/kafka-topics.sh --bootstrap-server my-kafka:9092 --topic goodbye.kafka --describe

Topic: goodbye.kafka	PartitionCount: 10	ReplicationFactor: 1	Configs: segment.bytes=1073741824,retention.ms=172800000
	Topic: goodbye.kafka	Partition: 0	Leader: 0	Replicas: 0	Isr: 0
	Topic: goodbye.kafka	Partition: 1	Leader: 0	Replicas: 0	Isr: 0
	Topic: goodbye.kafka	Partition: 2	Leader: 0	Replicas: 0	Isr: 0
	Topic: goodbye.kafka	Partition: 3	Leader: 0	Replicas: 0	Isr: 0
	Topic: goodbye.kafka	Partition: 4	Leader: 0	Replicas: 0	Isr: 0
	Topic: goodbye.kafka	Partition: 5	Leader: 0	Replicas: 0	Isr: 0
	Topic: goodbye.kafka	Partition: 6	Leader: 0	Replicas: 0	Isr: 0
	Topic: goodbye.kafka	Partition: 7	Leader: 0	Replicas: 0	Isr: 0
	Topic: goodbye.kafka	Partition: 8	Leader: 0	Replicas: 0	Isr: 0
	Topic: goodbye.kafka	Partition: 9	Leader: 0	Replicas: 0	Isr: 0

# 토픽 config 설정 추가
❯ bin/kafka-configs.sh --bootstrap-server my-kafka:9092 --alter --add-config min.insync.replicas=2 --topic goodbye.kafka

Completed updating config for topic goodbye.kafka.

# 토픽 config 설정 추가 확인
❯ bin/kafka-topics.sh --bootstrap-server my-kafka:9092 --topic goodbye.kafka --describe

Topic: goodbye.kafka	PartitionCount: 10	ReplicationFactor: 1	Configs: min.insync.replicas=2,segment.bytes=1073741824,retention.ms=172800000
	Topic: goodbye.kafka	Partition: 0	Leader: 0	Replicas: 0	Isr: 0
	Topic: goodbye.kafka	Partition: 1	Leader: 0	Replicas: 0	Isr: 0
	Topic: goodbye.kafka	Partition: 2	Leader: 0	Replicas: 0	Isr: 0
	Topic: goodbye.kafka	Partition: 3	Leader: 0	Replicas: 0	Isr: 0
	Topic: goodbye.kafka	Partition: 4	Leader: 0	Replicas: 0	Isr: 0
	Topic: goodbye.kafka	Partition: 5	Leader: 0	Replicas: 0	Isr: 0
	Topic: goodbye.kafka	Partition: 6	Leader: 0	Replicas: 0	Isr: 0
	Topic: goodbye.kafka	Partition: 7	Leader: 0	Replicas: 0	Isr: 0
	Topic: goodbye.kafka	Partition: 8	Leader: 0	Replicas: 0	Isr: 0
	Topic: goodbye.kafka	Partition: 9	Leader: 0	Replicas: 0	Isr: 0
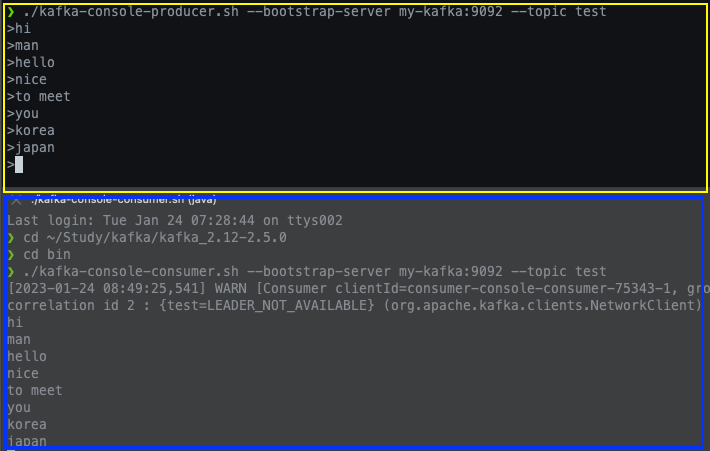
kafka-console-producer.sh
해당 명령어는 토픽에 데이터를 넣을수 있는 스크립트에 해당합니다. 테스트를 수행할 때 자주 사용될수 있는 명령어로 문자를 작성하고 엔터키를 입력하면 메세지가 전송됩니다.
메세지 key 와 value 를 가지는 레코드를 전송 하려는 경우는 몇가지 추가 옵션을 작성해야 합니다. key.separator (구분자)를 선언하지 않으면 기본 설정은 Tab delimiter(Wt) 이므로 key.separator 를 선언하지 않고 메세지를 보내려면 메세지 키를 작성하고 탭키를 누른 뒤 메세지 값을 작성하고 엔터를 눌러야 합니다.
bin/kafka-config-producer.sh --bootstrap-server my-kafka:9092 \
--topic hello.kafka \
--property "parse.key=true" \
--property "key.separator=:"

> key1:value1
> key2:value2
> key3:value3
>     ...
메세지 키와 메세지 값을 함께 전상한 레코드는 토픽의 파티션에 저장됩니다. 메세지 키가 null 인 경우에는 프로듀서가 파티션으로 전송할 때 레코드 배치단위(레코드 전송 묶음)로 라운드 로빈으로 전송합니다.
메세지 키가 존재하는 경우에는 키의 해시값을 작성하여 존재하는 파티션 중 한개에 할당됩니다. 이로 인해서 메세지 키가 동일한 경우에는 동일한 파티션으로 전송됩니다

kafka-console-consumer.sh
토픽으로 전송한 데이터를 확인할때 사용하는 명령어로 message key 와 message value 를 확인 할수 있지만 offset 정보를 확인 할 수는 없습니다 필수 옵션으로 —bootstrap-server 에 카프카 클러스터 정보, —topic 에 토픽이름이 필요합니다.
—from-beginning: 토픽에 저장된 가장 처음 데이터를 출력
bin/kafka-config-consumer.sh \
--bootstrap-server my-kafka:9092 \
--topic hello.kafka --from-beginnig

hello
kafka
3
2
1
0
   ...
—property: 레코드의 메세지 키와 메세지 값을 구분자를 이용해서 확인
bin/kafka-console-consumer.sh \
--bootstrap-server my-kafka:9092 \
--topic goodbye1.kafka \
--property print.key=true \
--property key.separator=":" \
--from-beginning

key1:value1
key2:value2
    ...
max-message: 최대 컨슘 메세지 개수를 설정
bin/kafka-console-consumer.sh \
--bootstrap-server my-kafka:9092 \
--topic hello.kafka \
--from-beginning \
--max-message 1

hello
Proceessed a total of 1 messages
partition: 특정 파티션만 consumer
bin/kafka-console-consumer.sh --bootstrap-server my-kafka:9092 \
--topic hello.kafka \
--partition 2 \
--from-beginnig

hello
group: consumer 그룹을 기반으로 토픽의 레코드를 어디까지 읽었는지 카프카 브로커에 저장 (commit)- consumer_offset 에 저장함
bin/kafka-console-consumer.sh \
--bootstrap-server my-kafka:9092 \
--topic goodbye1.kafka \
--group hello-group
--from-beginning

key1-value1
key2-value3
null-1
null-2

# offset 확인
bin/kafka-topics.sh --bootstrap-server my-kafka:9092 --list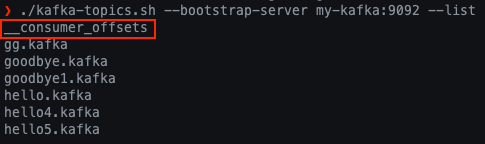
kafka-consumer-groups.sh
컨슈머 그룹으로 생성된 컨슈머는 토픽의 데이터를 가져갈때 그룹을 생성하는 명령을 따로 날리지 않고 컨슈머를 동작할때 컨슈머 그룹 이름을 지정하면 새로 생성됩니다. 생성된 컨슈머 그룹의 리스트는 kafka-consumer-groups.sh 명령어로 확인 할 수 있습니다
# 컨슈머 그룹 리스트 확인
bin/kafka-consumer-groups.sh \
--bootstrap-server my-kafka:9092
--list

consumer-group

# 컨슈머 그룹 상세정보 확인
bin/kafka-consumer-groups.sh \
--bootstrap-server my-kafka:9092 \
--group hello-group --describe
—describe 옵션을 사용하면 해당 컨슈머 그룹이 어떤 토픽을 대상으로 레코드를 가져갔는지 상태를 확인 할 수 있습니다. 파티션 번호, 현재까지 가져간 레코드의 오프셋, 파티션 마지막 레코드의 오프셋, 컨슈머 렉, 컨슈머 ID, 호스트를 알 수 있기 때문에 컨슈머의 상태를 조회 할 때 유용하게 사용 할 수 있습니다.

- 컨슈머 랙 : 마지막 레코드의 오프셋과 현재까지 가져간 레코드의 오프셋의 차이
- 오프셋 리셋 종류
—to-earliest: 가장 처음 오프셋(작은 번호) 으로 리셋 ← 모든 데이터 재처리를 의미함
—to-latest: 가장 마지막 오프셋(큰 번호) 으로 리셋
—to-current: 현 시점 기준 오프셋으로 리셋
—to-datetime: {yyyy-MM-DD HH:mm:SS} : 특정 일시로 오프셋 리셋(레코드 타임스탬프기준)
—to-offset {long}: 특정 오프셋으로 리셋
—shift-by { +/- long }: 현재 컨슈머 오프셋에서 앞뒤로 옮겨서 리셋
# 재처리 하도록 offset reset 처리
bin/kafka-consumer-groups.sh \
--bootstrap-server my-kafka:9092 \
--group hello-group \
--topic hello.kafka \
--reset-offsets --to-earliest --execute

...

bin/kafka-console-consumer.sh \
--bootstrap.server my-kafka:9092 \
--topic hello.kafka \
--group hello-group
kafka-producer-perf-test.sh
kafka-producer-perf-test.sh 명령어(스크립트) 는 카프카 프로듀서로 퍼포먼스를 측정 할 때 사용됩니다.
# 프로듀서 퍼포먼스 측정
bin/kafka-producer-perf-test.sh \
--producer-props bootstrap.servers=my-kafka:9092 \
--topic hello.kafka \
--num-records 10 \
--throughput 1 \
--record-size 100 \
--print-metric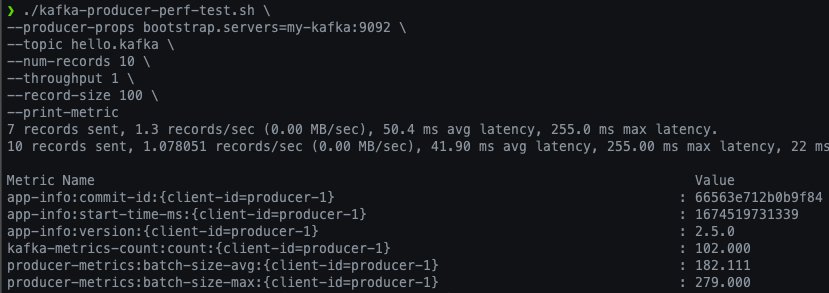
# 브로커와 컨슈머간의 네트워크 체크
bin/kafka-consumer-perf-test.sh \
--bootstrap-server my-kafka:9092 \
--topic hello.kafka \
--messages 10 \
--show-detailed-stats
kafka-reassign-partition.sh
리더 파티션와 팔로워 파티션의 위치를 변경하여 적절한 분산 처리를 수행 할 수 있습니다.
카프카 브로커에는 auto.leader.rebalance.enable 옵션이 있는데 이 옵션의 기본값은 true 에 해당하여 클러스터 단위에서 리더 파티션을 자동 리밸런싱 하도록 도와줍니다. 브로커의 백그라운드 스레드가 일정한 간격으로 리더의 위치를 파악하고 필요시 리더 리밸런싱을 통해 리더의 위치를 알맞게 분배합니다
cat partitions.json

{
	"partitions": [
		{
			"topic" : "hello.kafka", "partition": 0, "replicas": [ 0 ]
		}
	] ,"version": 1
}

bin/kafka-reassign-partitions.sh --zookeeper my-kafka:2181 \
--reassignment-json-file partitions.json --execute

kafka-delete-records.sh
워터마크를 표시하여 해당 offset 까지 레코드를 제거하는 명령어입니다.
cat delete.json
{
	"partitions": [
		{
			"topic": "hello.kafka", "partition": 0, "offset" : 5
		}
	], "version": 1
}

bin/kafka-delete-records.sh --bootstrap-server my-kafka:9092 \
--offset-json-file delete-json

Execoting records delete operation
Records delete operation competed:
partition: hello.kafka-0 low_watermark: 5
kafka-dump-log.sh
카프카 프로듀서로 보낸 record, index, timeindex, log 등을 확인할 수 있는 명령어 입니다.
그 외에 segment 로그등 자세한 로그 분석이 필요한 경우 사용할 수 있습니다.
bin/kafka-dump-log.sh \
--files data/hello.kafka-0/000000000000000.log \
--deep-iteration

Dumping data/hello.kafka-0/000000000000000.log
Starting offset: 0
......
etc
카프카 토픽 생성
카프카에서 토픽을 생성하는 상황은 아래와 같은 두가지 케이스가 있습니다
토픽을 효과적으로 유지보수하기 위해서는 토픽을 명시적으로 생성하는것이 좋습니다. 토픽마다 처리되어야 하는 데이터의 특성이 다르기 때문입니다. 토픽을 생성 할 때는 데이터 특성에 따라 옵션을 다르게 설정 할 수 있습니다. 예를 들어 동시 데이터 처리량이 많아야 하는 토픽의 경우 파티션의 개수를 100으로 설정 할 수 있습니다
단기간 데이터 처리만 필요한 경우에는 토픽에 들어온 데이터의 보관기간 옵션을 짧게 설정 할 수 도 있습니다. 그러므로 토픽에 들어오는 데이터 양과 병렬로 처리되어야 하는 용량을 잘 파악하여 생성하는 것이 중요합니다.
카프카 브로커와 로컬 커맨드 라인 툴
카프카 브로커로 커맨드 라인 툴 명령을 내릴 때 브로커의 버전과 커맨드 라인 툴 버전을 반드시 맞춰서 사용해야 합니다. 브로커의 버전이 업그레이드 됨에 따라 커맨드 라인 툴의 상세 옵션도 달라집니다. 이로 인한 버전 차이로 커맨드 라인 명령이 정상적으로 실행되지 않을 수 있기 때문에 항상 버전을 잘 확인해야 합니다.
Uploaded by N2T